

Custom-made Word/PDF: Customize your reports entirely!
By default, the PDF document summarises and organises your information on an impersonal form sheet. This is the standard PDF.
Custom-made Word/PDF
However, it is possible to customise this document with the header, layout, font, style … that YOU want. Kizeo Forms gives you total freedom to write YOUR own final report.
To do this, you will have to deal with some technical terms… but nothing serious! The 3 steps below will help you create a custom-made report that looks like you!
Step 1. Create a custom-made Word.
You are going to create what we call a custom-made Word. You will use Microsoft Word software, 2007 or newer. If you do not have the Microsoft Office suite, you can download the trial version or buy the full version on our partner’s site.
To customise your report, you will also need to know the item tags of your form. The item tags represent the reference code for each element (ex. ##customer##). For more information on item tags, you may consult our tutorial on Tags Help.
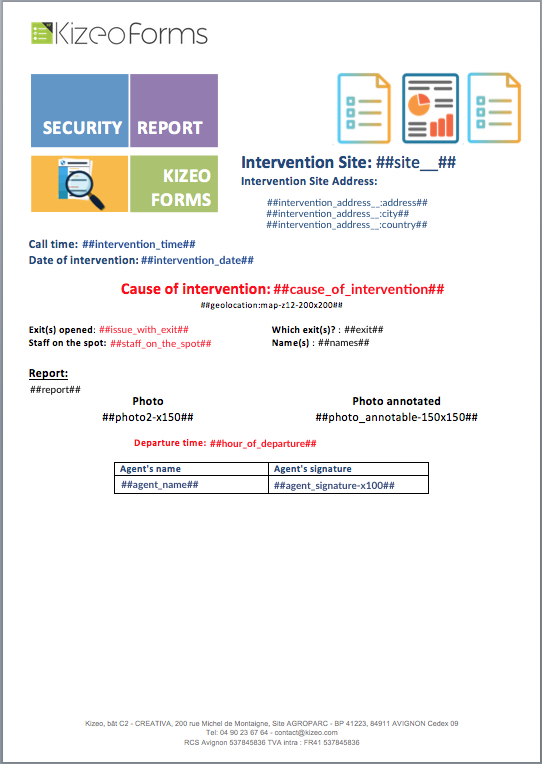
Open a blank Word page or download and take inspiration from the Word example provided by Kizeo. We strongly advise you to proceed that way. The advantage of this example is that it includes all the item tags for your properly written form.
- Go to the Exports tab.
- Click on Add a new export -> Download example.

- Build your document the way you want it by inserting (manually) the tags where you want them to display the information. For example, if you want the last name and first name of your client located on the same line, then you can simply place the item tags: Last name and First name side by side in your Word document.
- You also have the ability to include text, colours, images, etc.
- Similarly, you can make certain items disappear in your reports. For example, information necessary to manage your data, but providing no advantage to the customer.
Tips to create your Word template.
Tags:
Tables.
Integrate data into a Kizeo Forms table.
To integrate the data into a Kizeo Forms table in Word, you have 3 options.
- Insert a table with as many columns as necessary and two rows.
- On the first row, name your columns.
- On the second row, insert the item tags where you want the information to be displayed.

Item tag rows will display as many times as the entry rows.

- Insert a table with as many rows as necessary and two columns.
- In the first column, name your rows.
- In the second column, insert your item tags where you want the information to be displayed.

Item tag columns will display as many times as the entry rows during entry. The column with the headings will also be repeated.

- Insert a table and only insert one cell.
- Insert the item tags, one below the other in the cell.

When exporting, the data will appear as “blocks”, like on the standard PDF.

You can include multiple photos or drawings in Kizeo Forms tables.
To do this, simply enter as many photos/drawings in this tag: ##tag:n##(“n” being the number of the photo/ drawing) in the custom-made Word.
You have several options: To insert the item tags in the same box, separate them or put them in a row. See the example below.

NOTE: ##tag:1## or ##tag## both displays the first element.
You can display the row numbers of a table with the item tag ##_line_number##. This item tag only works if there is a single table.

If you have several tables, you can use the item tag ##_line_number:table1## where “table1” is the item tag for that table.
Display of Check boxes, slider, simple lists and multiple choice lists.
Display of simple and choice lists.
Let us imagine a list or a “Category” choice list, containing items such as “Airplane” and “Train”.
- The classic syntax to view the result in Word/PDF is:
##category## - The syntax to display the code in Word/PDF is:
##category:code## - The syntax to duplicate the row and maintain the chip format used:
##category:break## - The syntax to make a cross (x) when the value = Airplane:
##category-airplane:x:##
NB: If your list items are word groups, such as “Tourist airplane”, “High-speed train” and “Race car”, it is essential to define a Code to be able to use certain item tags.
To define a Code, go to the options of your field list or choices and enter the items under the Code:element format.
For instance (Code:Item):
A: Tourist airplaneT: High-speed trainC: Race car
For more details, you may consult our tutorial: How to display checkboxes in your reports
Therefore, the syntax to make a cross (x) when the value = “Tourist airplane” will be: ##category-A:x:##
For more details, you may consult our tutorial: List with code
Define a display colour.
You can define the display colour of each item. For example, you have a list with codes containing the three following items (Code:Item):
- T:Train
- C:Car
- A:Airplane
The following syntaxes will allow you to set a colour for each item:
##list-T:Train:##: If you want the Train item to appear in green when selected.##list-V:Car:##: If you want the Car item to appear in red when selected.##list-A:Airplane:##: If you want the Airplane item to appear in blue when selected.
Display of images.
You can also make Unicode characters appear in response. The Unicode Table website offers you the characters compatible with our system.
Important Information: For Macs, so that these images appear in Word, the corresponding item tag must be in a specific font, which is “MS Reference Sans Serif”.
Otherwise, they work properly in Word and PDF on PCs and in PDF on Macs.
The syntax to make ✈︎ appear when the value = Airplane:
- Category:
##category-Airplane:✈︎:##
Display of check boxes.
The principle is the same as above.
- The syntax to make ☑︎︎ or ☒ appear or depending on whether the box is checked or not is:
##check_box:☑︎:☒## - The syntax to make Yes or No appear depending on whether the box is checked or not is:
##check_box:Yes:No.##
New: You can now define the display colour of your check box depending on the response!
##check_box:Yes:##: Check box is checked Yes in the colour orange.##check_box:No:##: Check box is checked No in the colour green.
Display lists or choice field in the check box format.
The syntax to make ☑︎ or ☐ appear before various list or field choice items, depending on whether they are selected or not is:
##list-Element:☑:☐##
/i\ If the elements of your list or field choice are word groups, it is essential to assign them a code so that the tag works. For more information, please do not hesitate to consult the tutorial: List with codes.
The item tag syntax will then be as follows: ##list-Code:☑:☐##
Bulleted list and line feed:
You can use these following item tags with a list or choice field: ##list:break## and ##choice:break## to duplicate the row and maintain the chip format used.
Display of your Hierarchical Lists path.
You want to display all or part of your hierarchical list‘s path in your custom-made Word/PDF report, the following tags allow you to do so:
As an example,let’s take the following hierarchical list:
FR-fr:France\83:Var\83700:Saint-Raphaël
- The syntax to display the entire hierarchical path is:
##liste:path##
In our example, « France / Var » will be displayed on the report.
- The syntax to display the entire path as well as the label is:
##liste:fullpath##
You will have the following displayed on your report: « France / Var / Saint-Raphaël »
- The syntax to display each elements of your list individually is:
##liste:path-1##,In your custom-made Word/PDF :##liste:path-2##, etc…
##liste:path-1##will display « France »,
##liste:path-2##will display « Var ».
- To take it further:
It is possible to display the code in all exports by using the following tags:##liste:pathcode-1##/##liste:fullpathcode##
It is possible to display the label in all exports by using the following tags:##liste:pathlabel-1##/##liste:fullpathlabel##
Deletion of a paragraph in case of an empty or hidden data.
If a field is empty (no mobile entry) or invisible (due to visibility conditions), you may choose to delete an entire paragraph from your Word document.
Step 1. Enable the option.
One option is to be checked in each field or each field that may potentially be deleted from the customised document if the data is empty or invisible. Under the Advanced tab, check: ‘Delete unwanted paragraph on custom-made Word/PDF if missing or hidden data’.

Step 2. Attention to details is required when creating your custom-made Word.
Once the option is checked, you still have to write your Word template well so that empty or invisible ‘paragraphs’ do not appear in your final export.
Tip: To check what Word considers to be a change of paragraph, use the ¶ option!

We understand ‘paragraph’ within Word to mean:
- We remain in the same paragraph when we use Shift + Enter to go to the line.
- We are in a different paragraph when we use Enter to go to the line.
Parameters:
- If the item tag is located on the same line as its heading and if the delete option is selected, the entire line will be deleted.
- If the item tag is located under its heading but in the same ‘paragraph’, then the whole paragraph will be deleted if the data is empty or invisible.
- If the tag is located under its heading but not in the same ‘paragraph’, then the heading will remain in the final export.
Here is a preview in Word with the ¶ option using various possible entries:

In general, when we press Enter, Word changes paragraphs and, when we press Shift + Enter, it remains in the same paragraph.
Deletion of a block of paragraphs or a table in the case of empty or hidden data suppression.
If a field is empty (no mobile entry) or invisible (due to visibility conditions), you can choose to delete an entire part in your Word document or table with the block tag.
For example, you have a table in your form. You do not want it to appear in your Word document if it is not completed during mobile or tablet entry. You must build your block tag in two parts, one before the table, to make it disappear if empty and one, after this same table to frame it.
The item tag block syntax is:
##_block:field##
Make part of the Word document disappear.
##_block:field##
General rules:
- It can be configured with all fields.
- It enables you to: display or hide a part of your Word document, which may contain text, tables, images, etc.
- It is always built in two parts to frame the table or the block of paragraphs to make it appear or disappear: One tag before and the same tag after.
- It does not work in the header of the Word document.
Display of a block of paragraphs or a table determined by a field list or choice.
The block tag allows you to determine the visibility of a table or a block of paragraphs in your Word document based on a field list or choice.
For example, you have a field list with the following items (Code:Elément):
- T:Train
- C:Car
- A:Airplane
You want your block of paragraphs or table in your Word document to appear only if you selected “Airplane” in your list.
You must build your block tag in the following manner:
##_block:list-A##
Make part of the Word document appear if “Airplane” is selected.
##_block:list-A##
If you have selected “Train” or “Car” in your field list, your table or block of paragraphs will not appear in your Word document.
General rules:
- It can be configured with all fields.
- It enables you to: display or hide a part of your Word document, which may contain text, tables, images, etc.
- It is always built in two parts to frame the table or the block of paragraphs to make it appear or disappear: One tag before and the same tag after.
- It does not work in the header of the Word document.
Display of a block of paragraphs or a table determined by a field check box.
The block tag allows you to determine the visibility of a table or a block of paragraphs in your Word document based on the results of a check box.
You want your block of paragraphs or table in your Word document to appear only if you have checked Yes in the check box.
You must build your block tag in the following manner:
##_block:check_box##
Make part of the Word document appear.
##_block:check_box##
You want your block of paragraphs or table in your Word document to appear only if you have checked No in the check box.
You must build your block tag in the following manner:
##_block:check_box-0## (-zero)
Make part of the Word document appear.
##_block:check_box-0##
General rules:
- It can be configured with all fields.
- It enables you to: displayor hide a part of your Word document, which may contain text, tables, images, etc.
- It is always built in two partsto frame the table or the block of paragraphs to make it appear or disappear: One tag before and the same tag after.
- It does not work in the header of the Word document.
An example :
Step 2. Import the Custom-made Word template.
- Return to your form.
- Go to the Exports tab.
- Click on Add a new export.
- Load your Word template by clicking on Drag your Word template here.
- Close the window by clicking on Save.

Tips :
- You can analyze your template with the second part of the windows. In the example below, the template has only valid tags.

Step 3. Export data.
Now, watch the results. Go to the History page of your menu and click on Custom-made Word or PDF if needed.
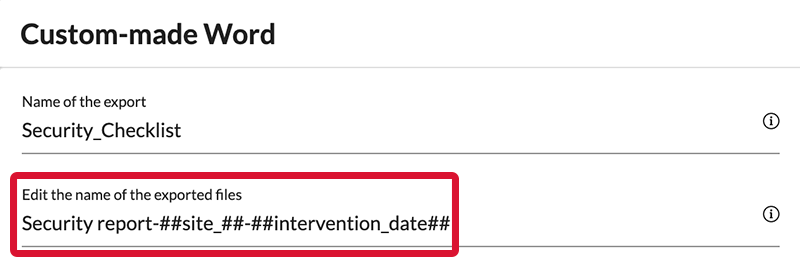
You can also rename your export files. For more information, refer to our tutorial.

Do not hesitate to comment on this article!
All your questions, comments and suggestions are most welcome!
 Cookies give you a personalized experience
Post a comment