Give a code to each item of your list or to each choice field.
The Code List allows you to change the name of a particular item when your export your form. Meaning that while filling the form in the field, the mobile worker will see the name of an item, and when the form will be exported a different name or reference will appear.
Comment: If the items of your list are not a single word but several words, such as “Tourist airplane”, it is important to define a Code to be able to use certain item tags in your customized Word/PDF or Excel/PDF.
Step 1 : Create your Code List.
Option 1. Put a code from your Excel file.
It is by far the best option if you want to create a long list. For more details on how to proceed, read this tutorial.
Option 2. Enter manually your referential list by creating a new external list.
- Go to the online platform -> External Lists
- Click on the Create an external list button.
- Enter the items of your list like this: 'Put your code here':'Put the name of your item here'
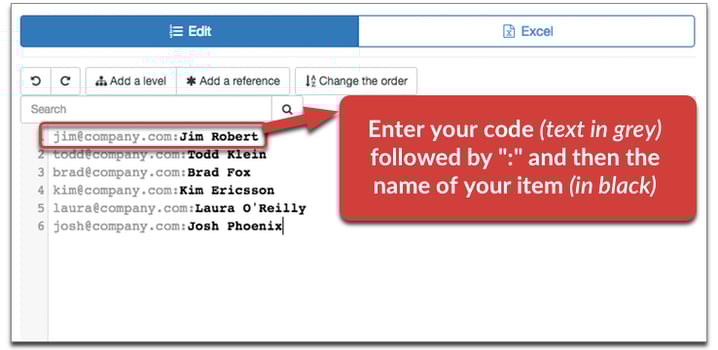
The text in grey in the picture above is called 'Code'. It is the text that will appear on your report. When you type ":" after a group of words, it will automatically convert this text in code. The text in black after the ":" is the name of your item, the one that the mobile user will see when filling the digital form.
Comment : The 'Code' doesn't appear on the mobile device when filling the form from your mobile device.
Step 2: Insert your list.
- Now Create a new form.
- Insert a List element by dragging it in the Edit box:

- Click on the green pencil icon of the List element (We will name it 'Who should you contact') and go the Features. Select your external list in the scroll bar External list:

Tip: Instead of selecting your list in the scroll bar, you can also type it or paste it directly into the 'List items' box:

Don't forget to confirm your those changes and save your form.
Create a Code List for your e-mails.
Let's take the example of a sale representative that fill the form on the field, right after visiting a client. He wants to send by e-mail a quote or a presentation of his products to the client. He will create a contact list with the e-mail adresses of each one of his clients.
He will use a code list. The code being in this case the e-mail address and the item being the name of the company the client work for. When filling the form on his phone, the sale representative will only see the company name. When the PDF report will be sent, the e-mail address will appear instead of the company name.
Settings
- Create a form and add a List or Choice element.
- Go the the Features of this element by clicking the blue pencil icon.
- Enter the content of your list choosing one of this 2 methods:
- Method 1 with <>
- Jim GALLAGER <jim@company.com>
- Todd KLEIN <todd@company.com>
- Brad FOX <brad@company.com>
- Method 2 with code:label
- jim@company.com: Jim GALLAGER
- todd@company.com:Todd KLEIN
- brad@company.com:Brad FOX
- Don't forget to confirm these settings and save your form!
- Go to the Options of your form, select the E-mail tab -> Add -> Recipients
- Add to the recipient field the tag belonging to the List element we created earlier with ':code'. In our case the List field was called 'Who should you contact' and the tag was ##who_should_you_contact##.

Meaning that if during the input on your mobile device, you select 'Todd KLEIN' in the List field named 'Who should you contact', an e-mail will automatically be sent at todd@company.com.
To learn more on how to send customized e-mails after filling a form, don't hesitate to read this tutorial.
To go a little bit further…
- Create group users to organize your Kizeo account.
- Manage the forms access rights of your users.
- Change your items display according to the profile of each user.
- Customize you reports with the tag list element.


