Automate your calculations with the Calculation element.
Presentation of the Calculation field.
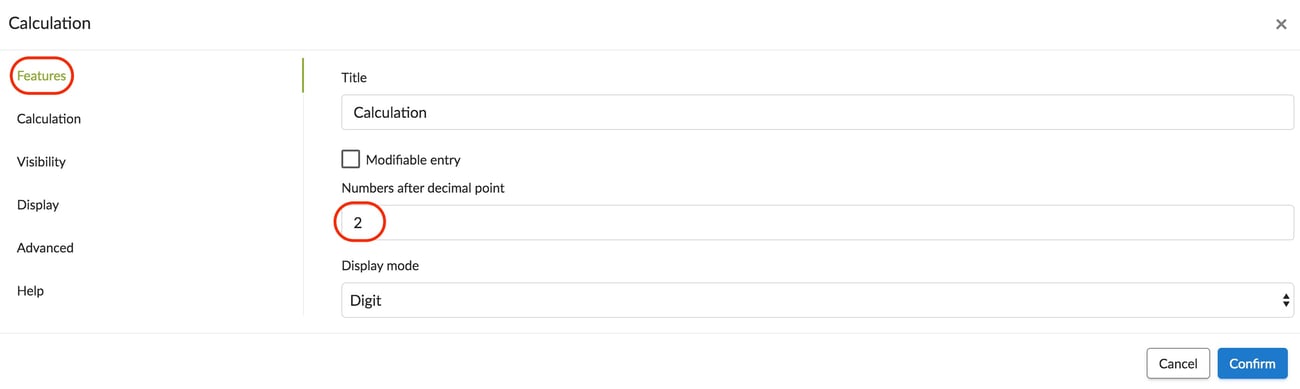
Insert a calculation field and access its features: Go to the element options by clicking on the pencil.  Several options are available to you under the Properties tab:
- Define how many digits after the decimal point will be included in your results.
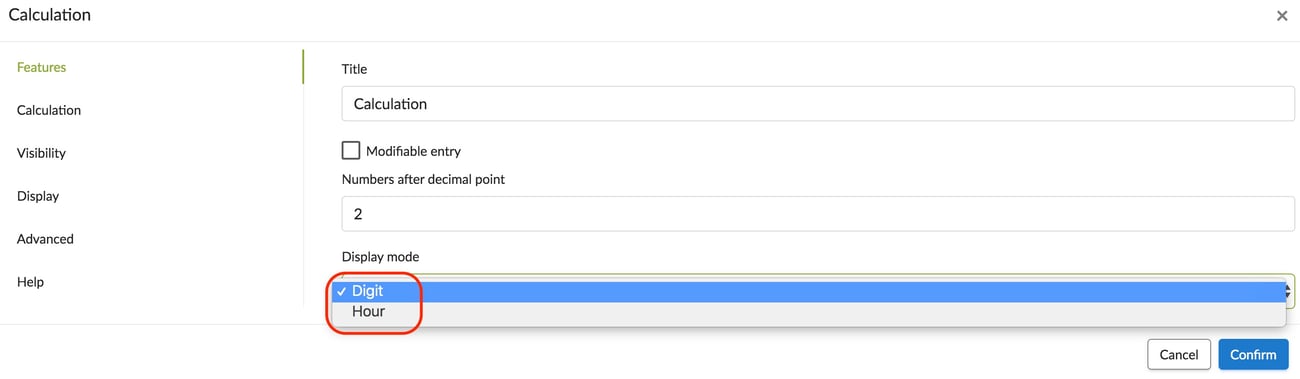
- Define the type of results in your calculation: number or time.
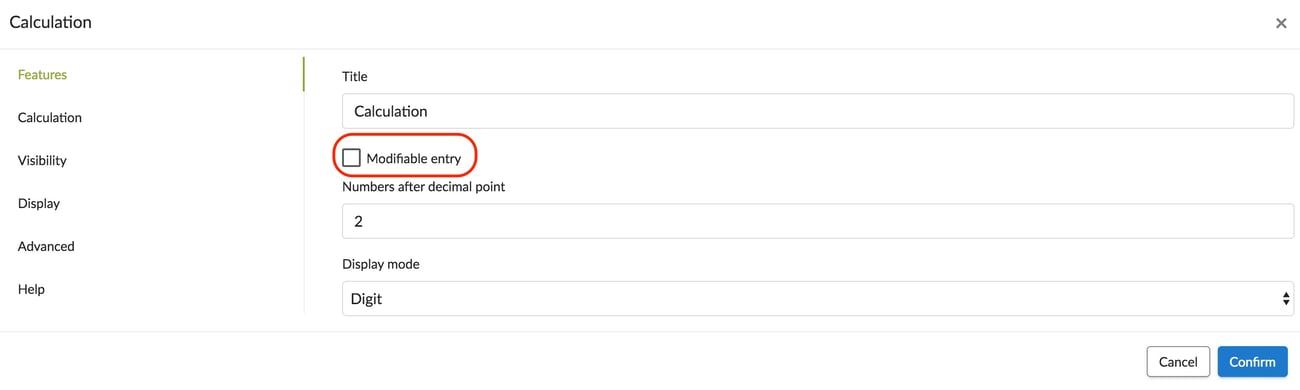
- By checking the Editable entry box, you can change the results of your calculation. For example, if you want to round the results.
 Under the Calculation tab, you will define the fields to calculate.
 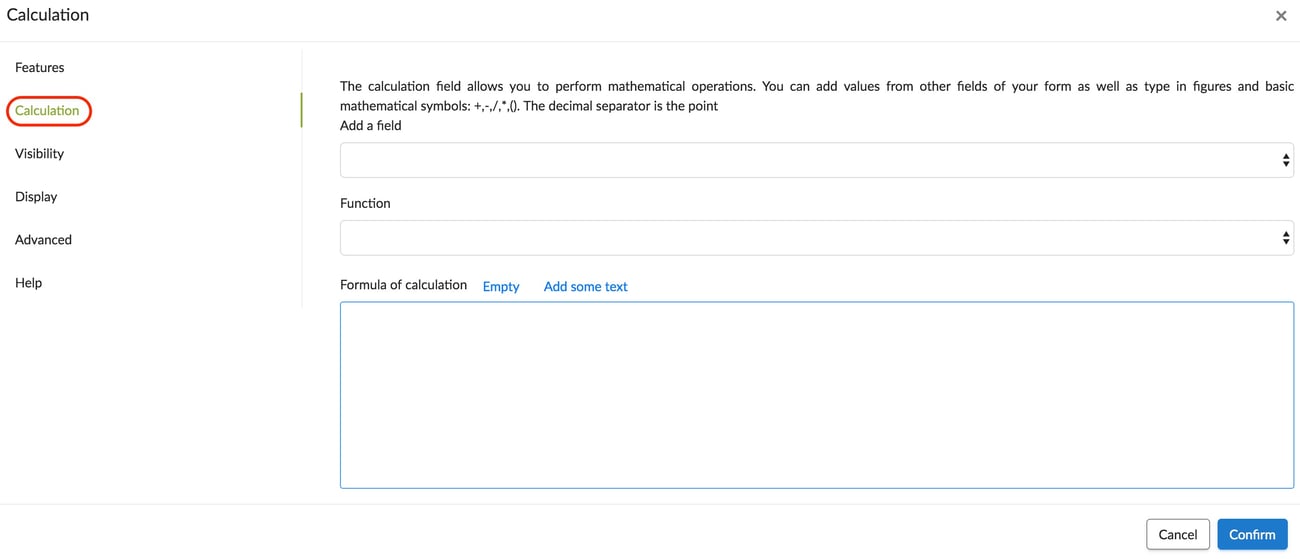 The Calculation tool has several functions.
Consider the following example: You want the price for an order to be automatically calculated.
In the back-office.
Example: Start by inserting an Input field and go to its properties: Rename it according to the needs of your form and choose the type that you need. In our example, the Entry field will be called “Price” and will be a “decimal number” type. 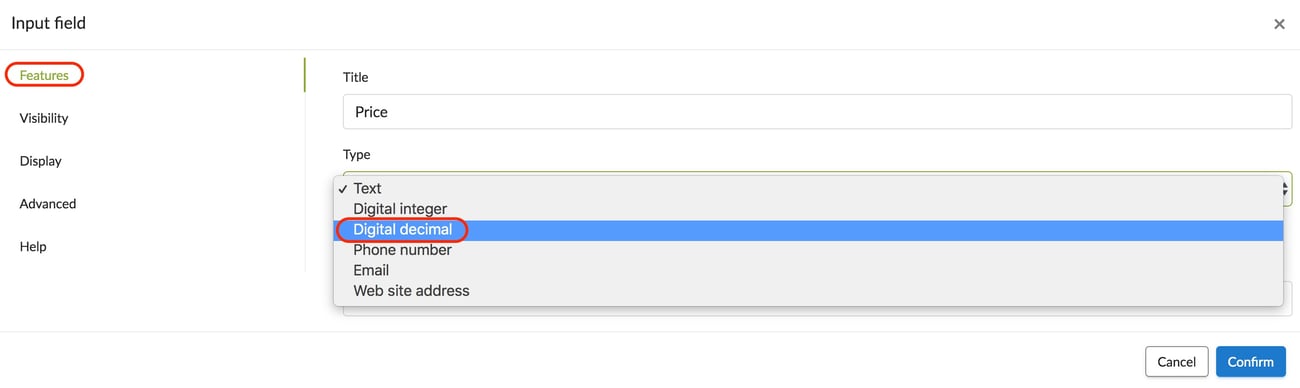
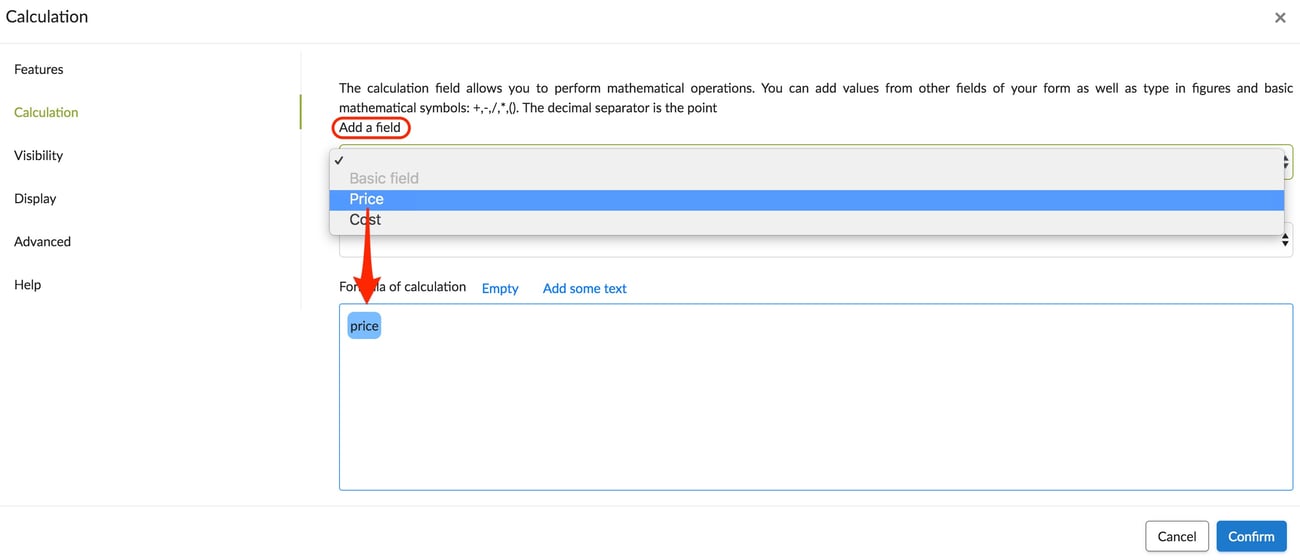
- Insert as many Input fields as necessary to make your calculation and set the properties of these fields.
- Then insert your Calculation field and go into its options.
- Add the “Price” field in the 'formula of calculation'.
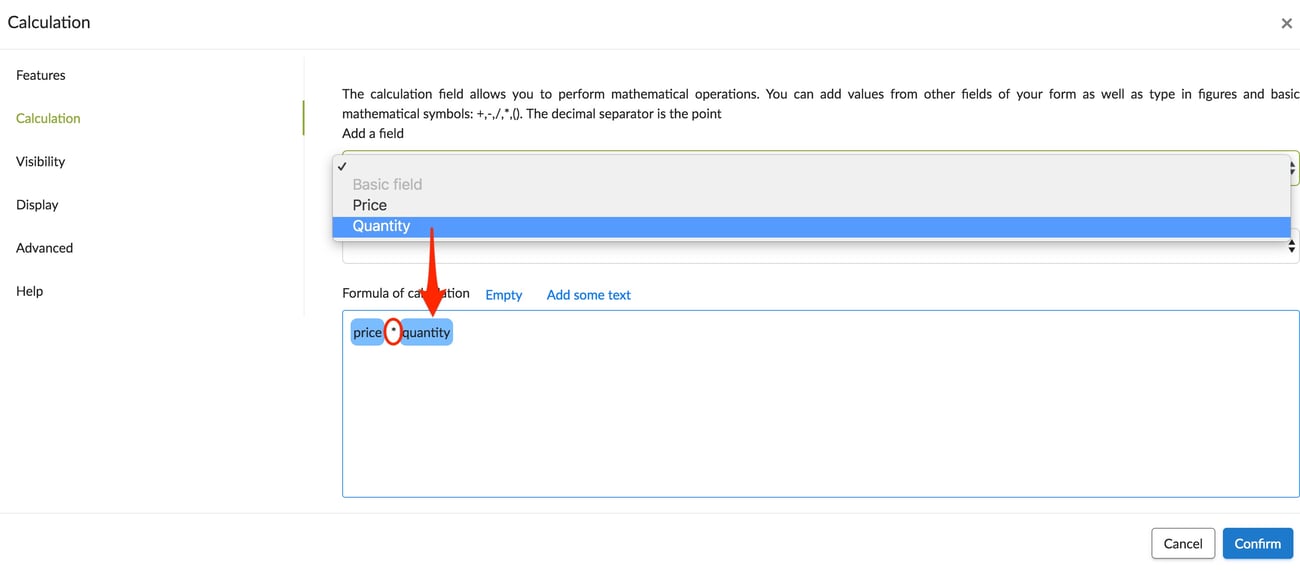
 Note : To define what multiplication is, you must enter " * " on the keyboard. Calculation signs are performed manually on the keyboard.
- Multiply with another field, like "Quantity" as shown here.
 Once completed, confirm and save your form.
On the mobile.
.jpg?width=225&height=500&name=T1%20(3).jpg)
In the back-office.
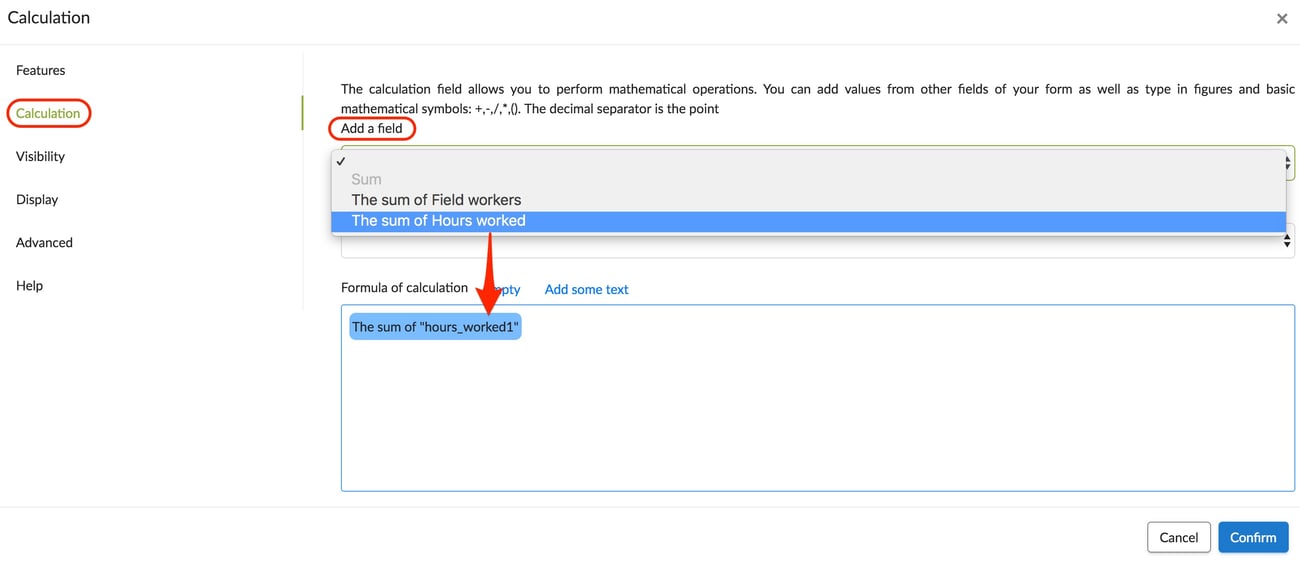
Consider the example of an employee time sheet.
- Create your time sheet form: A table with a list of participants and a numeric entry field where you specify the number of hours worked.
/!\ ATTENTION /!\ Specify clearly the “numeric” type. 
- Add an external Calculation field to the table.

- Define the field: According to the example, the field will make the sum of the "Hours worked” column.
- Confirm and save your form.
On the mobile.
.jpg?width=225&height=500&name=T2%20(2).jpg)
This feature enables it to work from the outset with a Referential list, but we would prefer to use the Reference element, which was developed expressly for this feature.
For those who already work with Referential lists and Calculation fields, this feature still works.
Idea: With the Referential and Calculation elements, you have the option to create a proper purchase order form. In order to obtain an identical document to your current purchase orders, you can create a Word template. Refer to the "purchase order" example, which is located in our forms library.
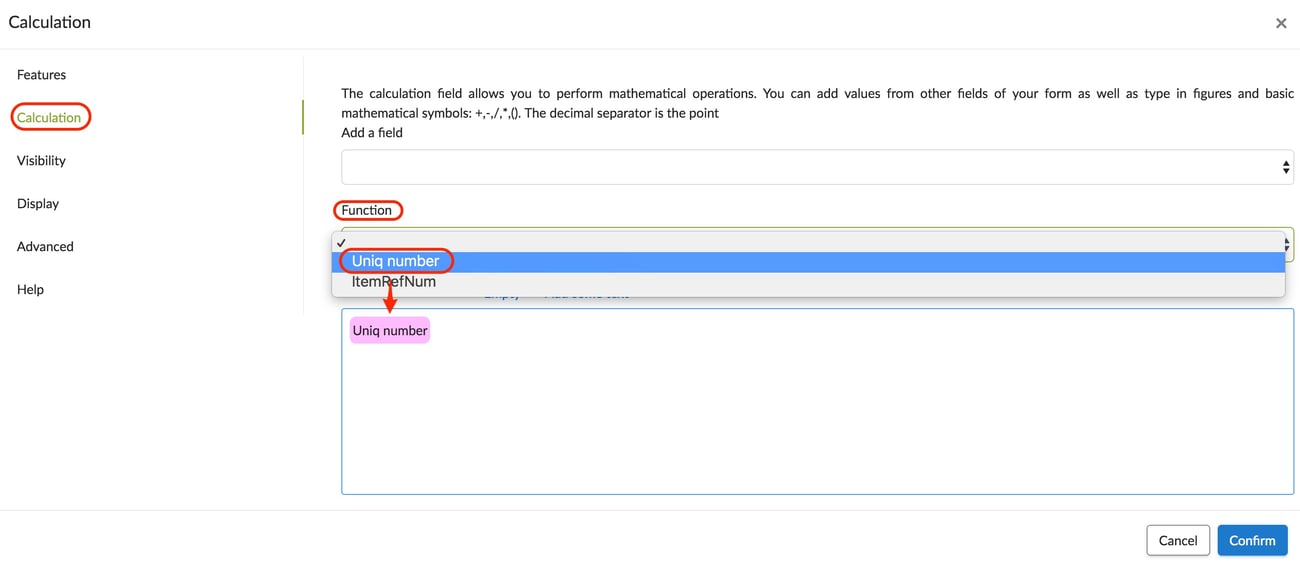
The Uniq Number allows you to create a random line. As an example, we will use the Uniq number to create the P.O number of your Purchase Order.
Configuration.
- Add a Calculation field and go in its option, ‘calculation’ tab.
- In the drop-down menu, select ‘Uniq number’.
 /!\ Don’t forget to confirm your settings and save your form .
On the mobile device.
.jpg?width=225&height=500&name=T3%20(1).jpg)
The ItemRefNum makes data reading easier. It is similar to the Reference field. It reads information contained in a given column. It is usually linked to an NFC Tag or an Input Field. To discover how to configure your NCF tag, do not hesitate to check our tutorial!
Square root
The Square Root function can be used to calculate area or volume, for example. When you select this function, the formula sqrt() is displayed. You can then :
Enter a value between the brackets to calculate the square root of that value
Place yourself between the brackets and select a field in the form to calculate the square root of the value entered in the field
Cosine
When you select this function, the formula cos() is displayed. By placing the cursor between the brackets, you can either enter a value or select a field on the form to calculate the cosine of the value in that field.
Sine
When you select this function, the sin() formula is displayed. By placing the cursor between the brackets, you can either enter a value or select a field on the form to calculate the sine of the value in that field.
Natural logarithm
When you select this function, the formula log() is displayed. By placing the cursor between the brackets, you can either enter a value or select a field on the form to calculate the logarithm of the value in that field.
Power
When you select this function, the pow() formula is displayed. By placing the cursor between the brackets, you can either enter a value or select a field on the form to calculate the power of the value in that field.
Exponential
When you select this function, the formula exp() is displayed. By placing the cursor between the brackets, you can either enter a value or select a field on the form to calculate the exponential of the value it contains.
Conditional operators
You can condition your calculations through different operators:
List of operators
Arithmetic operators:
- + : addition and concatenation of text
- - : substraction
- / : division
- * : multiplication
- % : modulo or remainder of Euclidean division
Comparison operators:
- < : lesser than
- <= : Less than or equal to
- > : greater than
- >= : greater than or equal to
- == : equality
- ! = : inequality
- === : strict equality
- !== : strict inequality
Logical operators:
- && : logical operator AND
- || : logical operator OR
- ! : negation
- ? : ternary operator. It is written in the form: ((condition)? Value_if_true: value_if_false)
Bitwise operators:
- & : AND "bitwise"
- | : OR "bitwise"
Examples:
Perform a calculation according to a checkbox
In order to perform a different calculation according to a checkbox, you can use the following formula:
-
Check box? my calculation or my text if my box is checked: my calculation or my text if my box is not checked.
In the example below, we want to apply a 5% discount if our box is checked.  For this, we test whether our apply 5% discount? box is checked or not. The deduction will be applied if the box is checked.
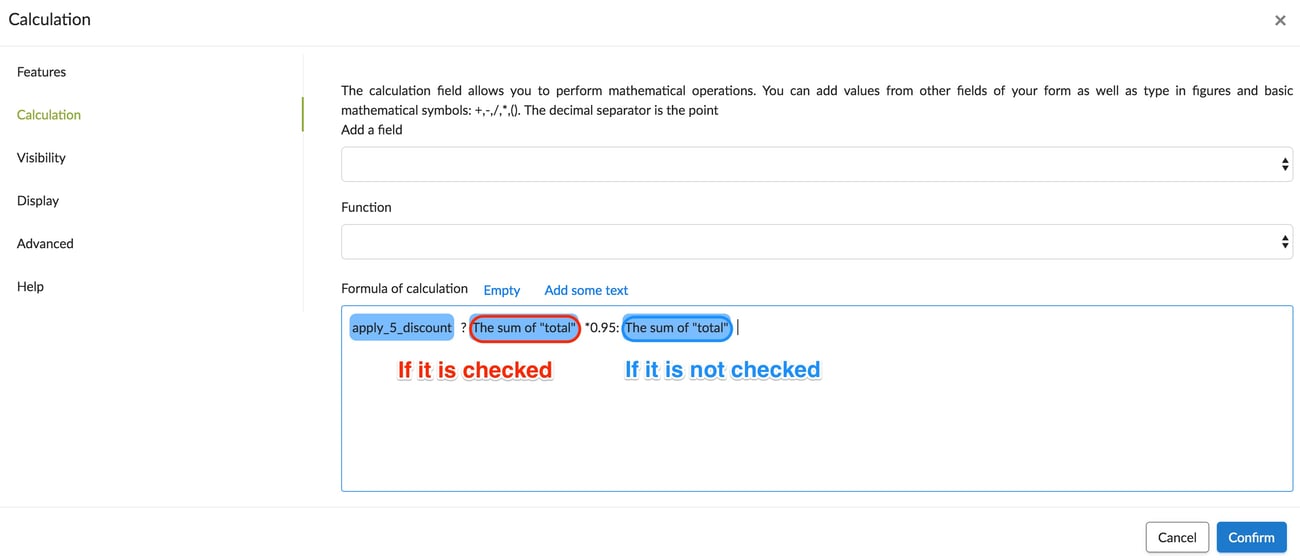

In order to give a value in our calculation when an element is selected in a list, we use the following formula:
- List == value code A? Value if true: Value if false
In the example below, we applied it to our calculation to offer VAT if New Customer is selected. At first, we assign a code to our list, of the form code: list. This code will of course not be visible on the mobile device.  We then test if our new client has been selected.
 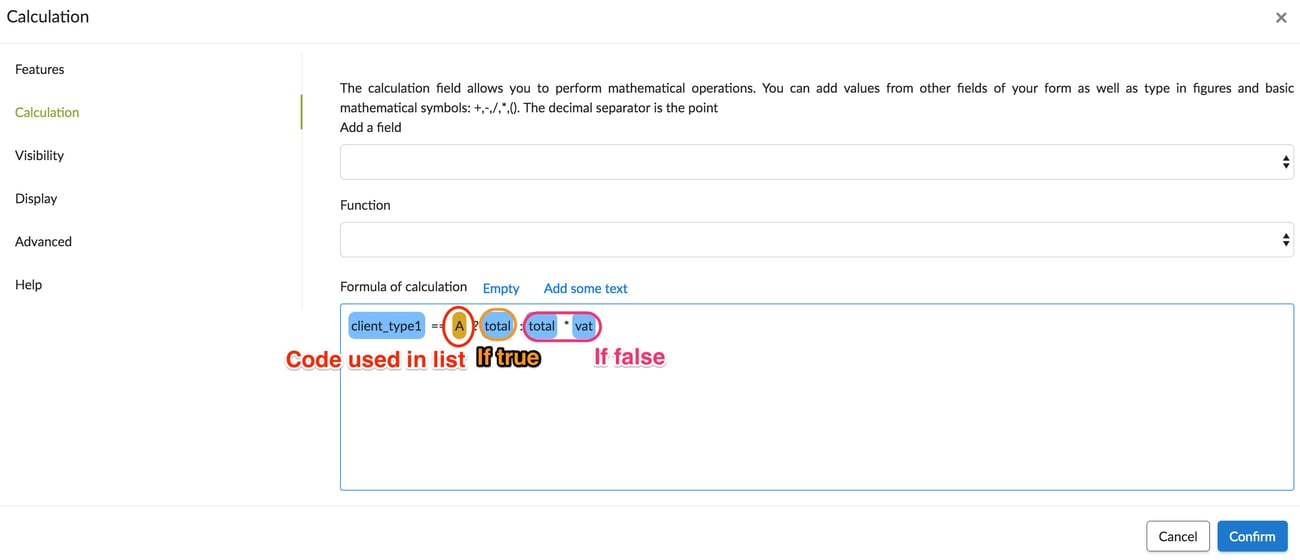 Warning: if you add text, remember to remove the + which is generated automatically.
Perform operations with conditions - example: average
In the example below, we want to achieve a grade average of 0 to 10 and not to consider an item that is not applicable. 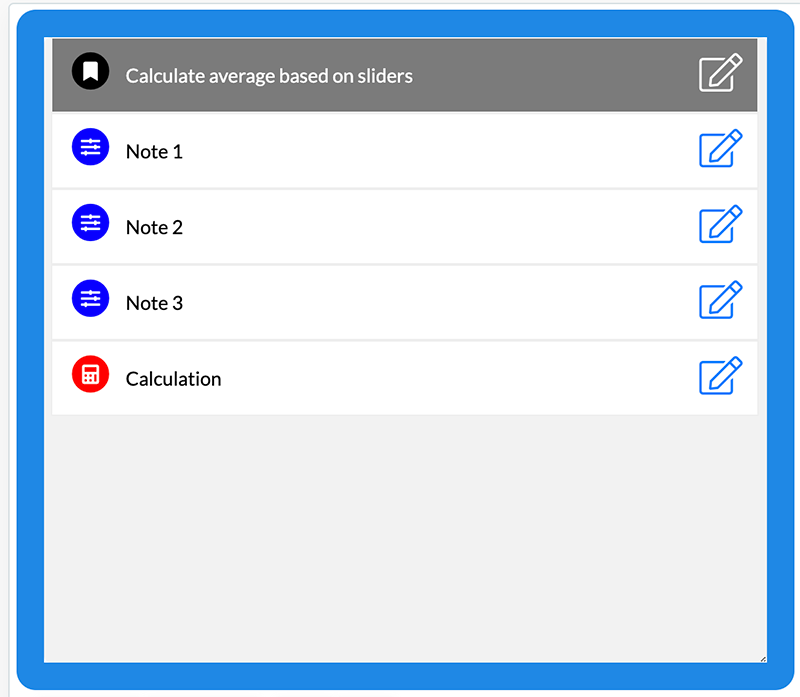 In our Slider elements, we select the type Text and we add our different notes, for the Not applicable, we give it a code, -1: 0 1 2 3 4 5 6 7 8 9 10 -1:Not applicable In our Calculation element, we test whether the non-applicable element is entered or not. For this we use the following formulas:
- my_slider == -1?0:my_slider <- so, if Not applicable is selected, its value in the calculation will be equal to 0, otherwise the chosen value will be taken into account. This operation will allow us to know the selected note.
- my_slider == -1?0:1<- thus, if Not applicable is selected, the value taken into account during the computation will be equal to 0; otherwise, it will be equal to 1. This formula will be used for the division to know how many items have been entered.
By repeating the first calculation for each slider element and then dividing by the second, we get the calculation below: 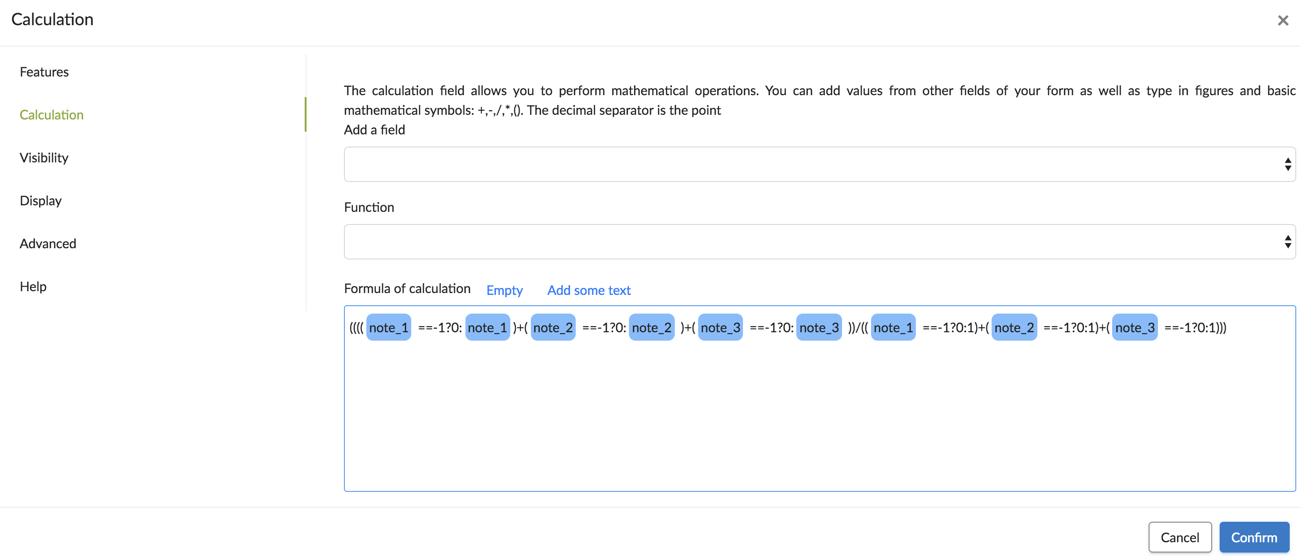
In order to display a result when a field is equal to another field, we use the following formula:
- Element A == element B? Value if identical: Value if different
In the example below, we applied it to two input fields to check if the email addresses are identical. 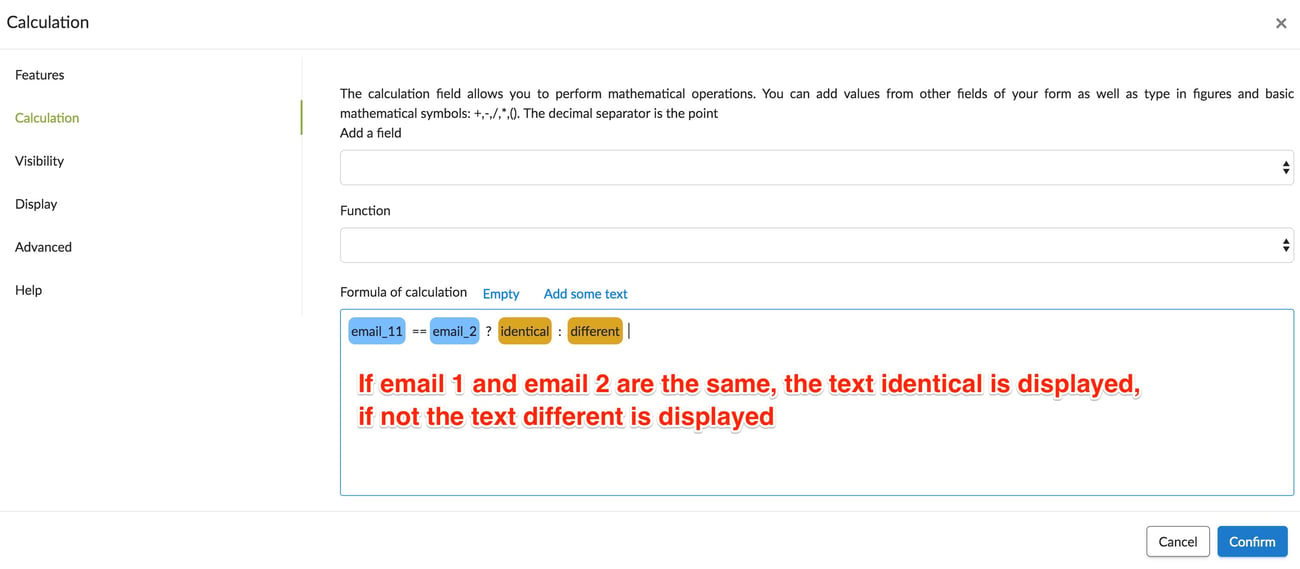 Warning: if you add text, remember to remove the + which is generated automatically.
Using two conditions - example: display a result if a field is greater than, less than, or equal to another field
If you want to combine several conditions, you can use the following formula:
- Our first condition? Value if true: Our second condition? Value if true: Value if false
If the first condition is false, we test the second, etc., until we reach the "Value if false" In the example below, we test our A value and B value to find out if A is greater than, less than or equal to B. We use the following formulas:
- Element A <element B? Value if true: Value if false
- Element A> element B? Value if true: Value if false
Combined, we get the operation below: 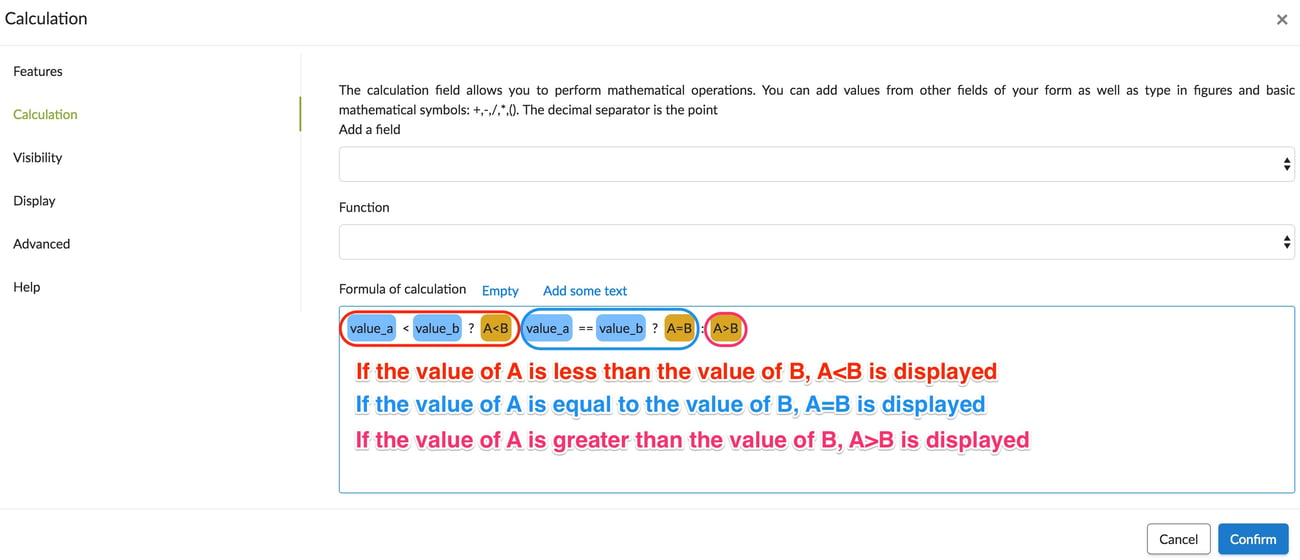 Warning: if you add text, remember to remove the + which is generated automatically.
OR Function (||)
To perform a calculation if a box is checked or if an item is entered, you can use this formula:
- Our first condition || Our second condition? Value if true: Value if false
At first, we will test the first condition, if it turns out wrong, we will test the second, so on. In the example below, we test our input field. If it contains 0, 2, 4, 6, 8 or 10, then Even will appear, otherwise it will be Odd. 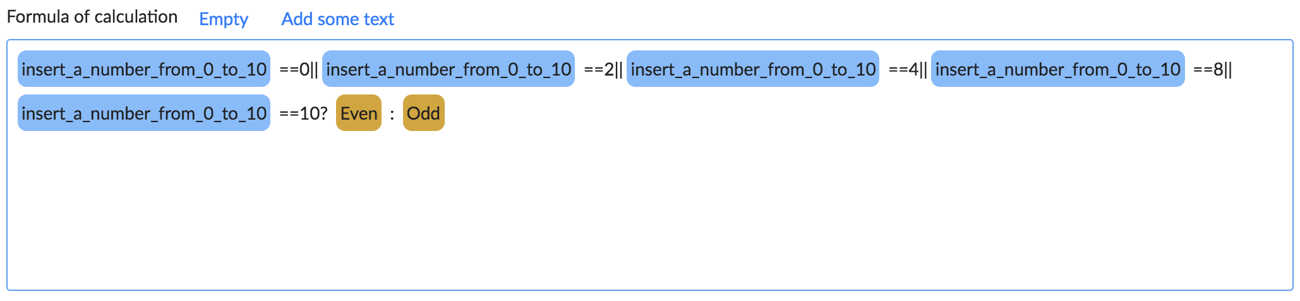 Warning: if you add text, remember to remove the + which is generated automatically.
Note: we could also have used the percentage (%) to perform this operation. The Percentage allows to display the rest during a division. Thus, if the number is even, the division will not have any remainder and the calculation will be equal to 0. 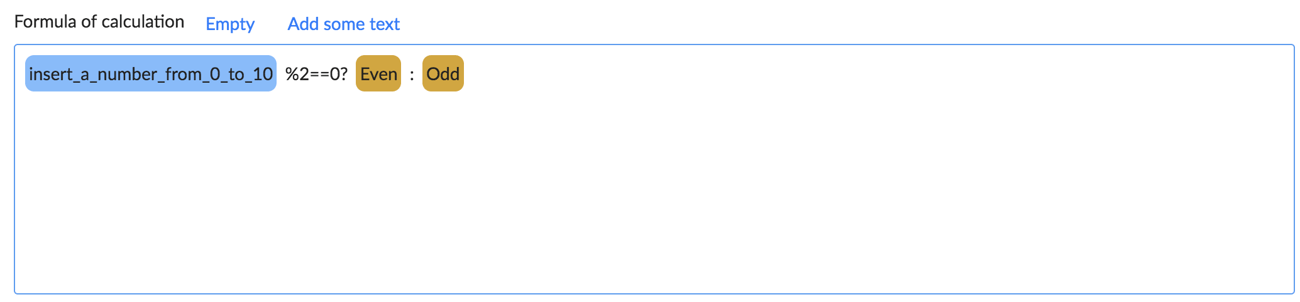
AND Function (&&)
To perform a calculation if a box is checked and an item is entered, you can use this formula:
- Our first condition && Our second condition? Value if true: Value if false
In the example below, we wish:
- Make a reduction of 10 € if the box New customer is checked
- Add a 10% or 20% VAT if the respective boxes are checked.
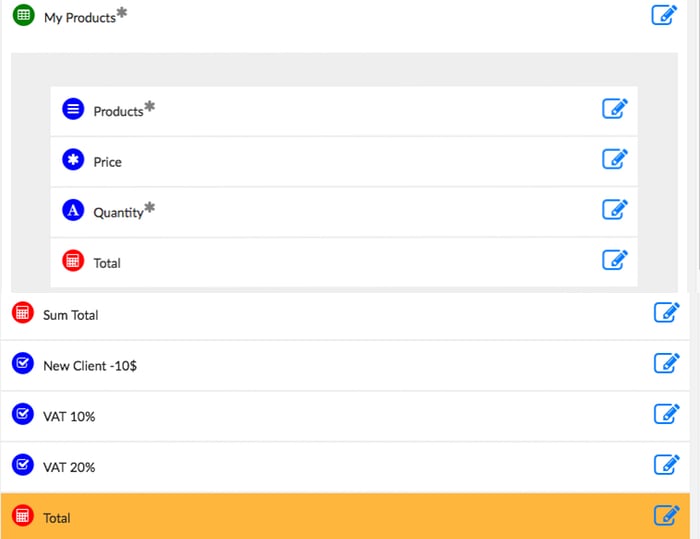 Thus, we test respectively:
- If the box New customer is checked
- If the box New customer and VAT 10% are ticked
- If the box New customer and VAT 20% are ticked
- If the 10% VAT box is checked
- If the VAT 20% box is checked,
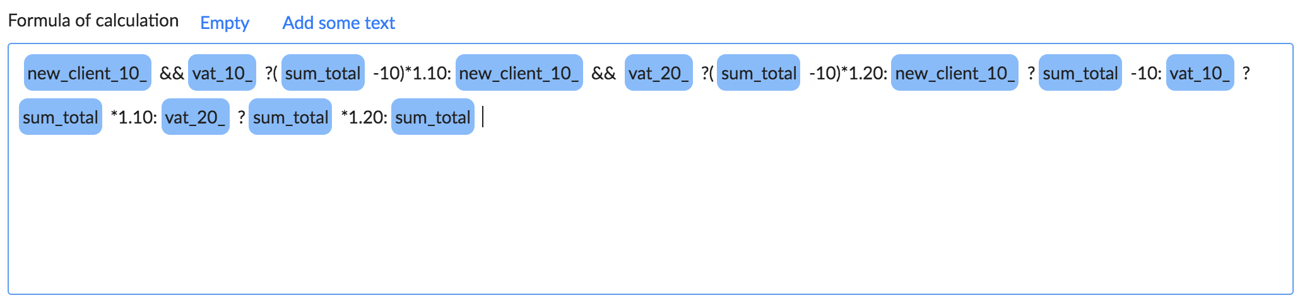 Warning: if you add text, remember to remove the + which is generated automatically.


